![]()
There are quite a few different architectures and protocols that you can use for the networking in your online multiplayer game.
WebRTC is a great peer-to-peer networking protocol for games:
- It's fast (usually using UDP underneath)
- It supports reliable, unreliable and partially reliable messages
- It has built-in NAT hole punching (ie. working around routers and firewalls)
- It even works in the web browser when exporting to HTML5!
The Godot game engine natively supports WebRTC with its High-Level Multiplayer API.
However, to get all your peers connected via WebRTC in the first place, you need to have a "signalling server" so they can figure out how best to make direct connections to each other.
In this tutorial, we're going to learn how to use the open source Nakama game server as the signalling server, taking advantage of the WebRTC and Nakama addon that I published in the Godot asset library.
Why peer-to-peer?
At the moment it seems like the "server authoritative" model has become the most popular networking architecture in the gamedev community. But it's not the only option! In fact, it might not be the best option for your game, depending on the game, your goals, resources and constraints.
No two games are alike and there are no one-size-fits-all options for networking. You can't grab "the best option" and just enable online multiplayer. You will have to draw from a pool of techniques (some which are mutually exclusive, and others which can be combined) to implement a good online experience in your game.
The peer-to-peer networking architecture works by establishing a mesh network, where all players have independent connections to every other player in a match.
Pro's
- If players are geographically close together, it can be much faster, and doesn't require maintaining servers in several different regions (ie. North America, Europe, Asia, etc).
- Server costs are dramatically lower than server authoritative - like, really dramatically: 10x, 100x, 1000x cheaper, depending on your game. Think $10/mo vs $10,000/mo. You really only need a signalling server, which gets light traffic, and then all the serious traffic is peer-to-peer. For small indie games, this may be the most important factor.
- Some network synchronization techniques (ie. ensuring all players are seeing nearly the same thing) are faster or more effective when implemented over peer-to-peer. For example, rollback and prediction based synchronization, most commonly used in competitive fighting games.
Con's
- Only really works for small numbers of players (roughly, 2-10) in a session at a time. It would be a bad choice for a 100-player Battle Royale game.
- Only really works for match or session based games, not games with a persistent world. So, it won't work for an MMO.
- It can be harder (but not impossible!) to prevent cheating. This is one of the reasons that most big, competitive AAA games don't use it. If you expect to have a department dedicated to fighting cheaters, or online tournaments with big cash rewards, then peer-to-peer may not be the best choice.
Hey, you can use WebRTC without peer-to-peer too!
WebRTC was designed to be peer-to-peer - but you don't actually have to use it that way!
Normally, each player would establish an independent connection to every other player. But, since you have to make each of those connections on purpose, you can choose to only connect to a central server.
So, if you're making an HTML5 game, but Web Sockets are too slow (since they use TCP), you can use WebRTC with the client-server architecture of your choice. Or, even with a desktop game, maybe you want to take advantage of the built-in NAT hole punching?
However, in this tutorial, we're only going to be using WebRTC to setup a session-based peer-to-peer game.
Why Nakama?
You could certainly make your own custom signalling server from scratch. What it needs to do to establish the WebRTC connections is very, very simple (basically just passing a few messages).
But in addition to just acting as the signalling server, you probably want it to do a couple other things, at the very least: user authentication and matchmaking. As you come up with more and more things you want your signalling server to do, maintaining it could become quite a big project.
Instead, if you choose to use Nakama, you get all of these features out-of-the-box:
- User authentication (including login via Steam, Google, Facebook, Game Center, etc)
- Matchmaking
- Realtime Multiplayer (this is what we use to pass the messages to establish the WebRTC connections)
- Authoritative Multiplayer (if you don't want to go peer-to-peer, you can implement server-side game logic in Go, Lua or Javascript/Typescript to run inside of Nakama)
- Realtime Chat
- Realtime Parties
- Leaderboards
- Tournaments
- Storage Engine (for storing arbitrary data - could be used for cloud save, among other things)
- Friends, Groups and Clans
- ... and more!
This way you can focus on building your game, and leverage Nakama for all these cool server-side features.
(Also, Nakama creator Heroic Labs is a platinum sponsor of Godot, and a group of really nice folks. :-))
Introducing the WebRTC and Nakama addon for Godot!
So, you want to use WebRTC and Nakama in your Godot game? Great!
To make that process easier, I've created the Nakama and WebRTC addon for Godot. All you have to do is call a couple methods and connect to a few signals, and it'll take care of all the dirty work of establishing (and maintaining) the WebRTC connections using Nakama as the signalling server.
I originally developed it for Retro Tank Party, an online 2-4 player party game, available on Steam and Itch.io.
Downloading it
Here's how to get the latest version on the command-line with Git:
git clone https://gitlab.com/snopek-games/godot-nakama-webrtc.git(FYI, if you're unfamiliar with Git, check out my free Godot & Git course for absolute beginners!)
However, you can also download a ZIP file from the GitLab page or the Godot asset library.
Installing and running Nakama
You'll need to have an instance of Nakama to connect to. The easiest way to run Nakama on your local computer is via Docker.
In fact, there's a docker-compose.yml included in the demo project! So, if you have Docker Compose installed on your computer, you can simply run this commands from top-level folder of the addon's source code:
docker-compose up -d... and now you have Nakama running with the default settings!
Let's try the demo!
Before we start using the addon in a new project, let's first try the demo.
Using Godot 3.3.2 or later, import the 'project.godot' file and run it by pressing F5 or the play button in the upper-right hand corner.
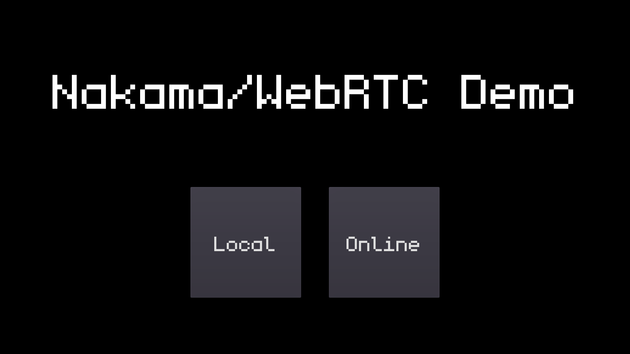
If you click "Local", you can play the game offline, but we're here to talk about online, so click the "Online" button.
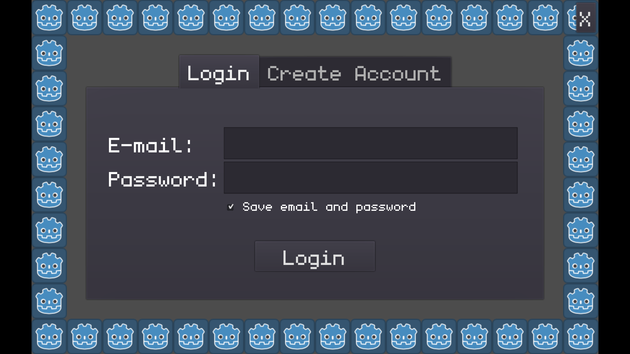
You'll be prompted to login. Since this is probably the first time you've used your Nakama instance, you'll need to click the "Create Account" tab and make an account for yourself.
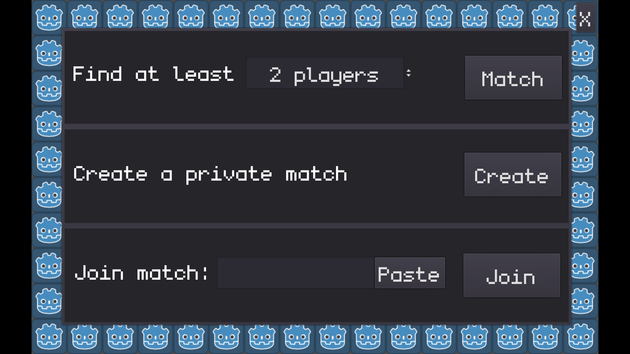
After you've logged in, you'll be prompted with a set of options for joining a match. Let's click the "Match" button which uses Nakama's matchmaking functionality. If you want, you could also try creating or joining a private match.
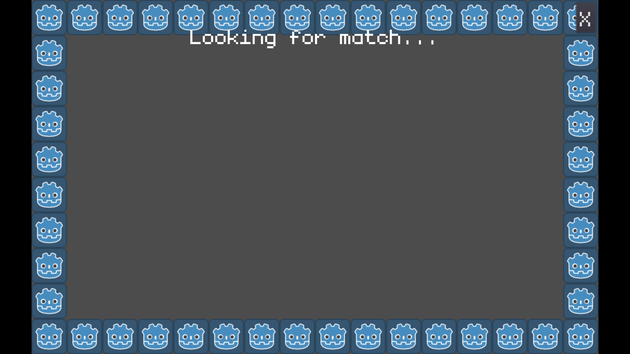
Alright! Now, we've got the first player in the matchmaking queue.
Open another instance of Godot, run the project, then repeat the same process. You can either use the same account you created before, or create a new one for added realism. :-) After waiting ~15 seconds in the matchmaking queue, the two players will be put into a session together!
(BTW, the ~15 second delay is configurable. In development it's annoyingly long, and you can make it much shorter. However, in production, this delay allows extra time for more players to join the match. Otherwise, you'd only ever get 2 player matches, as it'd start the match as soon as a 2nd player joined the matchmaking queue - it'd never wait long enough to start a 3 or 4 player match.)
Both instances of the game should now be showing the "ready screen":
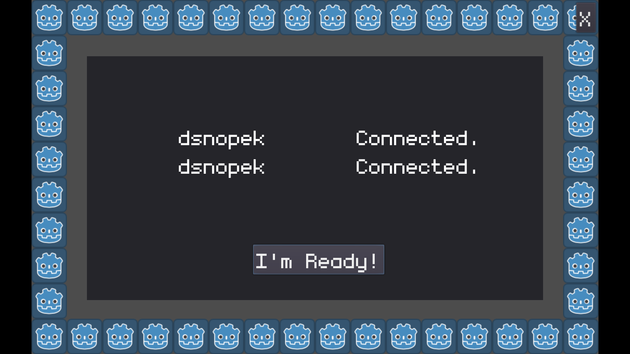
Locally, it probably happens so fast that you won't even notice it, but the text next to the player names will start as "Connecting..." before changing to "Connected." This represents the game setting up the WebRTC connection to that player.
Once all players are listed as "Connected", the "I'm Ready!" button will be enabled, signifying that we have established WebRTC connections to all peers.
If WebRTC is unable to establish a connection to one of the peers, you'll see it stuck on "Connecting...". This can happen if that user is behind a firewall that it's unable to "hole punch" through. The solution is to have a TURN server available to relay traffic when necessary. For Retro Tank Party, I'm renting a global network of TURN servers from Twilio, which only costs $0.40 per gigabyte transferred. Since most players are able to establish direct connections, I only spend around ~$0.20/month. :-)
The demo doesn't use any TURN servers, only a free STUN server from Google by default. Later in the tutorial, I'll show you how you set the list of STUN/TURN servers for your game.
In any case, click the "I'm Ready!" button in both windows to start the game:
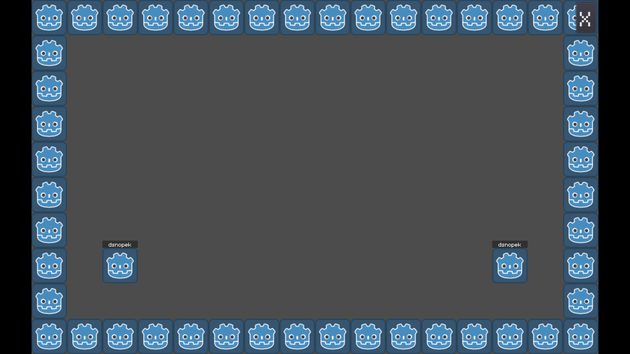
This is a very simple (and not very fun) game. :-)
You move your player with the WASD keys, and press SPACE to "attack" the other player. The player that remains alive is the winner of that round. The first player to win 5 rounds wins the whole match.
The important thing is that all of the player movement is synchronized between both instances of the game over WebRTC!
Step-by-step: Using the addon in a new project
We're not going to build an actual game.
Even the simplest game requires a ton of things that don't directly relate to WebRTC or Nakama (for example, the UI), and if you want to see what that would look like, take a look at the source code for the demo.
Instead, we're going to start a new project from scratch, and put together the smallest possible working example, so that you can understand what all the pieces are.
Oh, and I'm going to assume that you already have some experience with Godot and GDScript.
Part 1: Create the project and copy some files
Let's get started:
- Open up Godot 3.3.2 or later, and create a new project. It doesn't matter if you choose OpenGL ES 3.0 or 2.0 - we aren't going to be rendering anything.
- Copy the whole 'addons' directory into your project. This contains the code for my Nakama/WebRTC addon, as well as the Nakama client library from Heroic Labs.
- Copy both the 'webrtc' and 'webrtc_debug' directories into your project as well. These contain the GDNative libraries for Windows, Linux and MacOS from the official WebRTC plugin for Godot.
Part 2: Add autoloads and enable GDNative plugins
Let's make sure all the necessary addons and plugins are enabled:
-
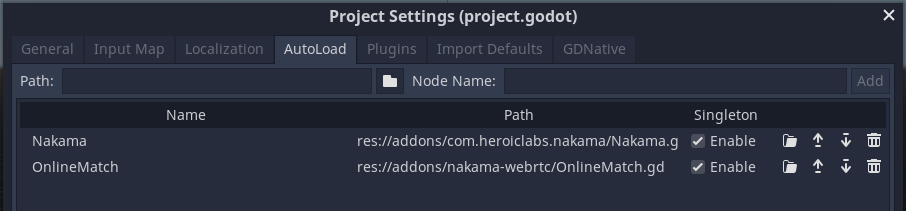
In the Godot editor, click "Project" -> "Project Settings..." and switch to the "AutoLoads" tab.
-
Click the little folder icon next to the "Path" field, open "res://addons/com.heroiclabs.nakama/Nakama.gd" and click the "Add" button.
-
Click the little folder icon again, but this time open and add "res://addons/nakama-webrtc/OnlineMatch.gd". Afterwards, your "AutoLoad" tab should look like this:
-
Next, switch to the "GDNative" tab. You should see both webrtc.gdnlib and webrtc_debug.gdnlib enabled:
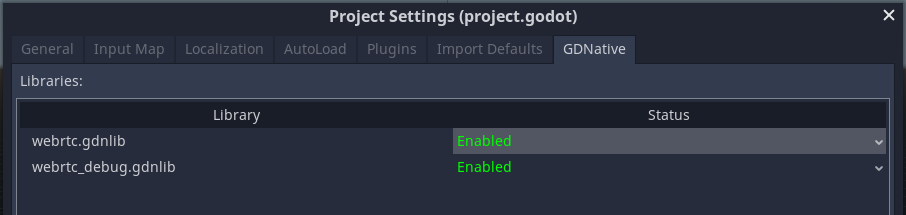 If not, double check that you copied the 'webrtc' and 'webrtc_debug' directories.
If they still aren't there, it could mean that you're using a platform that doesn't have a pre-compiled library. For example, there's only a build for MacOS on x86-64 - if you have one of the new Mac's that run on ARM64, you'll need to compile the GDNative plugin yourself.
If not, double check that you copied the 'webrtc' and 'webrtc_debug' directories.
If they still aren't there, it could mean that you're using a platform that doesn't have a pre-compiled library. For example, there's only a build for MacOS on x86-64 - if you have one of the new Mac's that run on ARM64, you'll need to compile the GDNative plugin yourself.
Part 3: Create the main scene
Finally, we'll get to some code! :-)
-
Create a new scene with Node2D as the root node (the default for "2D Scene") and save it as Main.tscn.
-
Then attach a new script called Main.gd and copy-paste the following content:
extends Node2D

func _ready() -> void:
  connect_to_nakama()
We're going to add more and more to this script, starting with the 'connect_to_nakama()' function.
Connecting to Nakama
Next, add the following code to the end of the file:
var nakama_client: NakamaClient
var nakama_session: NakamaSession
var nakama_socket: NakamaSocket

func connect_to_nakama() -> void:
  # Connect to a local Nakama instance using all the default settings.
  nakama_client = Nakama.create_client('defaultkey', 'localhost', 7350, 'http',
    Nakama.DEFAULT_TIMEOUT, NakamaLogger.LOG_LEVEL.ERROR)

  # Login to Nakama using "device authentication".
  var device_id = OS.get_unique_id()
  nakama_session = yield(nakama_client.authenticate_device_async(device_id, "Example"), 'completed')
  if nakama_session.is_exception():
    print ("Unable to connect to Nakama")
    get_tree().quit()

  # Open a realtime socket to Nakama.
  nakama_socket = Nakama.create_socket_from(nakama_client)
  yield(nakama_socket.connect_async(nakama_session), "completed")

  print ("Connected to Nakama!")

  join_an_online_match()
This authenticates with Nakama using device authentication for simplicity. In a real desktop game, you'd probably want to login with email and password, like in the demo. However, that would require building the necessary UI, which is beyond the scope of this tutorial.
Next, we open a realtime socket to Nakama, so that we can use Nakama's realtime multiplayer functionality. This is what the addon uses to perform the work of a "signalling server" and establish the WebRTC connections.
We end by calling the 'join_an_online_match()' function which we'll add in the next section.
Configuring the addon and joining a match
Add this code next:
func join_an_online_match() -> void:
  # We can configure OnlineMatch before using it:
  OnlineMatch.min_players = 2
  OnlineMatch.max_players = 4
  OnlineMatch.client_version = 'dev'
  OnlineMatch.ice_servers = [{ "urls": ["stun:stun.l.google.com:19302"] }]
  OnlineMatch.use_network_relay = OnlineMatch.NetworkRelay.AUTO

  # Connect to all of OnlineMatch's signals.
  OnlineMatch.connect("error", self, "_on_OnlineMatch_error")
  OnlineMatch.connect("disconnected", self, "_on_OnlineMatch_disconnected")
  OnlineMatch.connect("match_created", self, "_on_OnlineMatch_match_created")
  OnlineMatch.connect("match_joined", self, "_on_OnlineMatch_match_joined")
  OnlineMatch.connect("matchmaker_matched", self, "_on_OnlineMatch_matchmaker_matched")
  OnlineMatch.connect("player_joined", self, "_on_OnlineMatch_player_joined")
  OnlineMatch.connect("player_left", self, "_on_OnlineMatch_player_left")
  OnlineMatch.connect("player_status_changed", self, "_on_OnlineMatch_player_status_changed")
  OnlineMatch.connect("match_ready", self, "_on_OnlineMatch_match_ready")
  OnlineMatch.connect("match_not_ready", self, "_on_OnlineMatch_match_not_ready")

  # Join the matchmaking queue.
  OnlineMatch.start_matchmaking(nakama_socket)

  print ("Joined the matchmaking queue...")
The OnlineMatch singleton does all the work setting up WebRTC using Nakama.
First, we configure it by setting a number of variables:
OnlineMatch.min_playersandOnlineMatch.max_playerssetup the upper and lower limit for the number of players that can be in a match in this game.OnlineMatch.client_versionis a string, representing the version of this client. OnlineMatch won't let players join a match unless they have the same client version as the "host" cilent. We'll talk a little bit more about the host below.OnlineMatch.ice_serversis a list of STUN and/or TURN servers. STUN servers enable two clients to find a path through the internet to each other, which is what allows WebRTC to make direct connections. There are plenty of free STUN servers, from Google, Twilio and others. On the other hand, TURN servers relay traffic between two clients (requiring much more bandwidth), and so you'll need to host your own (coturn is a great Open Source implementation) or pay to rent them. For hobby games, it's probably fine to only use STUN servers, but for a commercial game you'll need to have TURN servers to fallback on.- When
OnlineMatch.use_network_relayis set toOnlineMatch.NetworkRelay.AUTOit will first try to connect via STUN, but fallback on TURN if any TURN servers are present in OnlineMatch.ice_servers. If set toOnlineMatch.NetworkRelay.FORCEDit will only use the TURN servers, andOnlineMatch.NetworkRelay.DISABLEDwill only use the STUN servers. In Retro Tank Party, we let users configure this on the settings screen, in case it's automatically picking the wrong option.
Then, we are connecting to all of OnlineMatch's signals. We'll talk about these in depth in the next section.
And, finally, we attempt to join a match, by calling OnlineMatch.start_matchmaking() to enter the matchmaking queue. This is only 1 of 3 ways to join a match:
-
OnlineMatch.start_matchmaking(_nakama_socket: NakamaSocket, data: Dictionary = {}) -> voidEnters the matchmaking queue. The data dictionary can have the following keys:
-
min_count and max_count to override the values set in OnlineMatch.min_players and OnlineMatch.max_players, but it can't go outside those bounds. This can be used to allow the player to say they only want to play with a specific, more restrictive number of players.
-
string_properties and numeric_properties can be used to set properties of the current player and query can be used to find other players with matching properties, for example:
var data := {
  string_properties = {
    region = 'US',
  },
  numeric_properties = {
    rank = 6,
  },
  query = "+region:US +rank:>=5 +rank:<=7",
}
In this example, we're requiring a match with players in the same region (ie. "US") and within 1 rank of our current rank (6). See the Nakama documentation for more information on properties and queries.
-
-
OnlineMatch.create_match(_nakama_socket: NakamaSocket) -> void
Creates a private match. -
OnlineMatch.join_match(_nakama_socket: NakamaSocket, _match_id: String) -> void
Joins a private match.
A quick note about "the host"...
Even though WebRTC is peer-to-peer, we're always picking one peer to be "the host". The host will always have a peer id of 1, and you can tell if you're the host or not by calling get_tree().is_network_server() in GDScript.
When using matchmaking the host is selected "randomly" (it's the user with the lowest session id when sorted alphabetically), and in a private match, it's the user who created the match.
In OnlineMatch, the host has a few special responsibilities, such as ensuring that all clients are on the same version and letting new players know who the other players are when they first join.
The demo project gives the host a few more responsibilities, such as scoring, and coordinating the start and end of each round.
In your game, you can chose to give the host more work to do, even going so far as making it completely authoritative. Or, you could go all the way in the other direction, and have each client validate the messages from all the other clients and make its own decisions on the state of the game, including the score and winner. It's up to you and what you think will provide the best experience to your players.
Responding to signals
Almost everything else is done by responding to signals.
Handling errors and lost connection
func _on_OnlineMatch_error(message: String) -> void:
  print("ERROR: %s" % message)

func _on_OnlineMatch_disconnected() -> void:
  print("Disconnected from match.")
The "disconnect" signal will get emitted whether you were disconnected normally, or because of an error.
Successfully joining a match
As we discussed above, there are 3 ways to join a match: matchmaking, creating a private match, and joining a private match.
Each has a corresponding signal that is emitted when they are successful (the "error" signal is emitted in the case of failure):
func _on_OnlineMatch_match_created(match_id: String) -> void:
  print("Private match created: %s" % match_id)

func _on_OnlineMatch_match_joined(match_id: String) -> void:
  print("Joined private match: %s" % match_id)

func _on_OnlineMatch_matchmaker_matched(players: Dictionary) -> void:
  print("Joined match via matchmaker")
  for player in players.values():
    print ("Player found via matchmaker: %s" % player.username)
When a match is created via matchmaking, you'll get information about all the players right away. With the other methods, you'll find out about them when the "player_joined" signal is emitted, which we'll look at in the next section.
The Dictionary passed in the "matchmaker_matched" signal is keyed by the Nakama session id and contains OnlineMatch.Player objects, with the following properties:
session_id:the Nakama session idpeer_id:the Godot peer id, per Godot's High-Level Networking APIusername:the Nakama username
Changes to players in the match
There's a couple of signals that are emitted when players join or leave a match:
func _on_OnlineMatch_player_joined(player: OnlineMatch.Player) -> void:
  print("Player joined: %s" % player.username)

func _on_OnlineMatch_player_left(player: OnlineMatch.Player) -> void:
  print("Player left: %s" % player.username)
And one signal that's emitted when the player's status changes:
func _on_OnlineMatch_player_status_changed(player: OnlineMatch.Player, status) -> void:
  print("Player status changed: %s -> %s" % [player.username, status])
  if player.peer_id != get_tree().get_network_unique_id() && status == OnlineMatch.PlayerStatus.CONNECTED:
    rpc_id(player.peer_id, "receive_message", "Hi! We're connected now :-)")

remote func receive_message(message: String) -> void:
  print("Message from %s: %s" % [get_tree().get_rpc_sender_id(), message])
The status argument will be one of:
OnlineMatch.PlayerStatus.CONNECTING: we're still attempting to form the WebRTC connection to this peer. You can't yet send RPC's to this peer.OnlineMatch.PlayerStatus.CONNECTED: the WebRTC connection is complete, and now they will receive RPCs! The example calls the 'receive_message' method on the newly connected peer.
This is what powers the change from "Connecting..." to "Connected" on the ready screen in the demo.
Finally, there are two signals that are used to tell us if the match is ready to start:
func _on_OnlineMatch_match_not_ready() -> void:
  print("The match isn't ready to start")

func _on_OnlineMatch_match_ready(players: Dictionary) -> void:
  print("The match is ready to start! Here are players:")
  for player in players.values():
    print ("- %s" % player.username)

  OnlineMatch.start_playing()
  if get_tree().is_network_server():
    rpc("start_game")

remotesync func start_game() -> void:
  print ("The host told me it's time to start the game!")
The match is considered ready, when there are WebRTC connections established to all peers. It can switch from ready back to not ready if a connection is lost, or if a new player joins the match and we still haven't connected to them via WebRTC yet.
This is what enables or disables the "I'm ready!" button on the ready screen in the demo.
In the example code, when the match is ready, we call OnlineMatch.start_playing() which changes the OnlineMatch.match_state to OnlineMatch.MatchState.PLAYING, preventing any new players from joining this match.
At this point, you'd actually kick off the game!
Putting it all together!
Here's the full code of the Main.gd.
If you run it in two instances of Godot, you'll get output that looks something like:
Connected to Nakama!
Joined the matchmaking queue...
Joined match via matchmaker
Player found via matchmaker: Example
Player found via matchmaker: Example
Player status changed: Example -> 1
Player status changed: Example -> 1
The match is ready to start! Here are players:
- Example
- Example
The host told me it's time to start the game!
Message from 2: Hi! We're connected now :-)
A few odds and ends...
There's a couple other methods and properties you should probably know about:
OnlineMatch.leave() -> void
Leaves the match or the matchmaking queue on purpose.OnlineMatch.players
A Dictionary keyed by Nakama session id, containing OnlineMatch.Player objects.OnlineMatch.get_players_by_peer_id() -> Dictionary
A convenience function for getting a Dictionary keyed by peer id, containing the OnlineMatch.Player objects.
That's not everything, but for the rest, please take a look at the code for OnlineMatch.gd.
Could I just copy the demo instead?
Yes, you could!
The demo is actually made up of simplified code that was originally copied out of Retro Tank Party, and it would work perfectly fine as a starting point for a new game.
Srayan Jana aka ValorZard, a community member on the Snopek Games discord server, put together some great notes on how the demo works.
Let me know how it goes!
I'd love to hear about what you're working on!
And if you have any problems or questions, please leave a comment below, or chat in Discord.
Happy Hacking! :-)